
Pentium 4 3GHz
There is always a good reason to put a relatively old hardware lying around to good use, and that is, make a backup server out of it. As for the choice of software, there hasn’t been a lack of it to choose from as a tool to run on that hardware capable enough to run as a backup server appliance.

Trusty and reliable FreeNAS 0.69 (v6.9) backup server
Though I have already been backing up my data using Time Machine on Airport Time Capsule 2G, I have also been running rsync backup, side by side with Time Machine, using FreeNAS 0.69 (FNv6) on a somewhat old hardware (a rack-mount server with a P4 CPU.) FNv6 has been working as my backup without any problem at all. In fact, if not for the Time Machine capability of the new FreeNAS 9.2 (FNv9), I would stay with FNv6 for as long as I could. I am not quite sure if previous versions – v7‘s and v8‘s – have Time Machine support, but FNv6 definitely did not have one.
With this support on the current version, I am upgrading so I can perform a Time Machine backup on it as well. The software appliance is available for download at freenas.org with the usual selection of 32-bit or 64-bit arch.
Booting via USB
Using dd to copy FNv9 to USB flash drive
It is recommended that the appliance be installed and booted from a USB flash drive, that way, any and all hard drives can be allocated solely for storage purposes. It is also recommended that the drive be 2GB or more. As for my trusty old hardware, it is rather capable of booting via USB, hence there is no hard drive to waste.
In Linux and Mac OS X, making a bootable FreeNAS image USB flash drive is just a matter of uncompressing the image file and using dd to copy the file to the flash drive. If you use Windows to create the boot drive, the setup guide has details for the OS as well. All of these instructions and more are in the setup guide and is available for download from freenas.org.
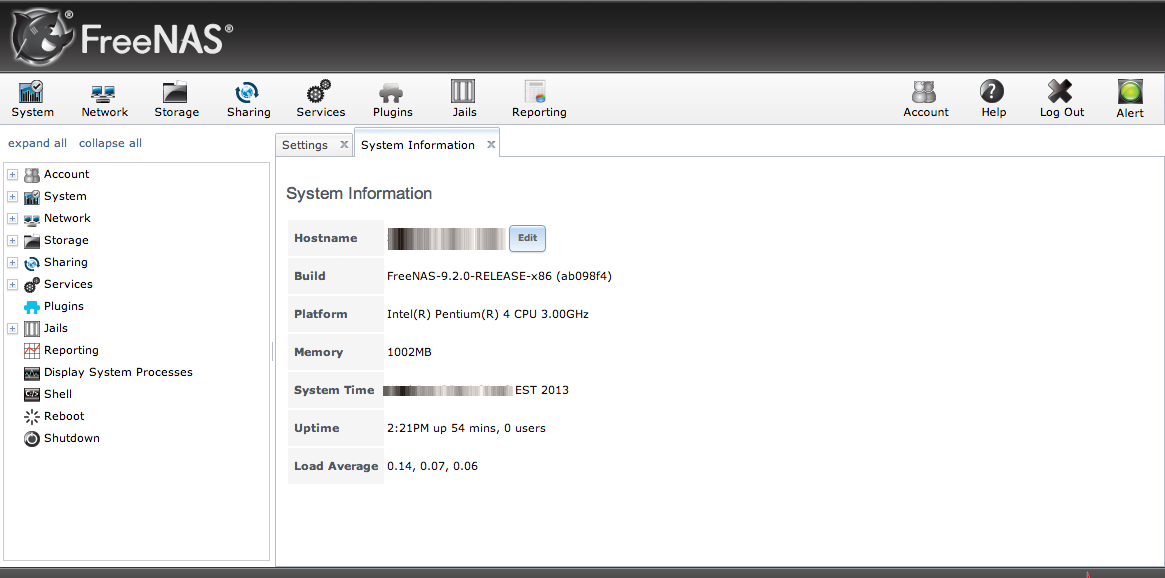
FreeNAS v9 System Info
Having done all of the following:
- copying the image file to the USB flash drive, and booting it for the first time,
- assigning an IP address for the NIC via my DHCP server,
- supplying a
rootusername/password combination,
the hardware is now officially running FreeNAS 9.2.
Setting up the Time Machine storage volume
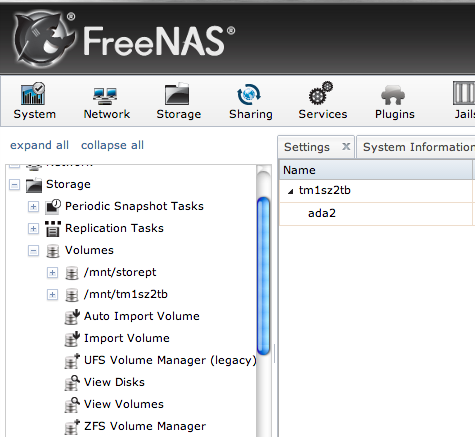
UFS volume tm1sz2tb contains the AFP share
I next created a UFS volume that will eventually contain the Apple Filing Protocol (AFP) share for Time Machine. In my setup, I created volume tm1sz2tb (a not so creative name indicating a Time Machine designation on a 2TB size disc.) I planned to use a ZFS volume but after reading its requirements in the setup guide, I decided otherwise. My hardware may not be able to handle ZFS.
Note that the Time Machine feature is only available on AFP shares, not on NFS, nor on CIFS.
Setting up the Time Machine AFP share

Creation of AFP share. Note that Time Machine is enabled.
Next, I created the AFP share whose path is on volume tm1sz2tb, and named it tm_afp_archive1. I made sure that the Enable Time Machine option is checked.
This AFP share is what I will expect to see when the time comes to configure Time Machine via the System Preferences pane on Mac clients. Having finished all the setup requirements on my FreeNAS appliance, the time has come to turn my attention on the Mac computers that will be backed up.
Configuring a Time Machine client
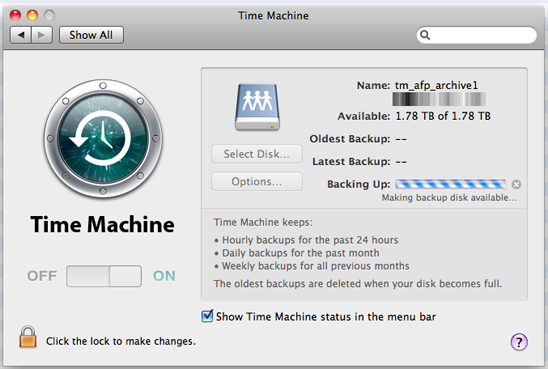
Time Machine using FreeNAS 9.2
Setting up Time Machine between a Mac computer and Airport Time Capsule is quite straightforward. This is no different with FreeNAS v9 and Macs – at least in my experience. As long as the AFP service is enabled on FreeNAS, its guaranteed that the AFP shares show up on my Mac’s Finder application. This of course is true only after logging into the FreeNAS server. As for the clients, my Mac computers are still running Snow Leopard (10.6.8).
To begin using FreeNAS Time Machine capability on my MacBook, I opened System Preferences -> Time Machine, and selected the AFP share named tm_afp_archive1, via Select Disk. This is the same AFP share I just created on my FreeNAS appliance. From there, I could see that the back-up process is starting.
Conclusion

Active services
As has been my experience even with the old FreeNAS, version 9.2 has been nothing but very solid and accessible, and very easy to configure via its web-based user interface. It has all the services that I wanted for as a backup server appliance. The absence of Firefly as iTunes/DAAP server, notwithstanding, has always made me a big fan of it.
I have also enabled the other bundled services that came with it as this can be useful especially when copying files between other computers in my household. I normally use ftp or CIFS shares between Windows and Linux boxes, for example. I also use CIFS or AFP between Macs.
Postscripts
- It is always a good idea to read the setup guide, especially about hardware requirements, if you are planning to install FreeNAS on an old hardware. Incompatibilities may arise.
- During the first sync with Time Machine, as is for the first time with any other backup, it is better to have a wired connection between the computer you want to sync and the backup server. Wired connection, especially with 1Gbps, is by far faster than a wireless connection. That becomes apparent when backing up hundreds of gigabytes of data for the first time.
